A container is a standard unit of software that packages up code and all its dependencies so the application runs quickly and reliably from one computing environment to another. Docker is the chosen container platform to produce container images for Aperture Data Studio. Docker container images are available for both Linux and Windows-based applications. Containerized software will always run the same, regardless of the infrastructure.

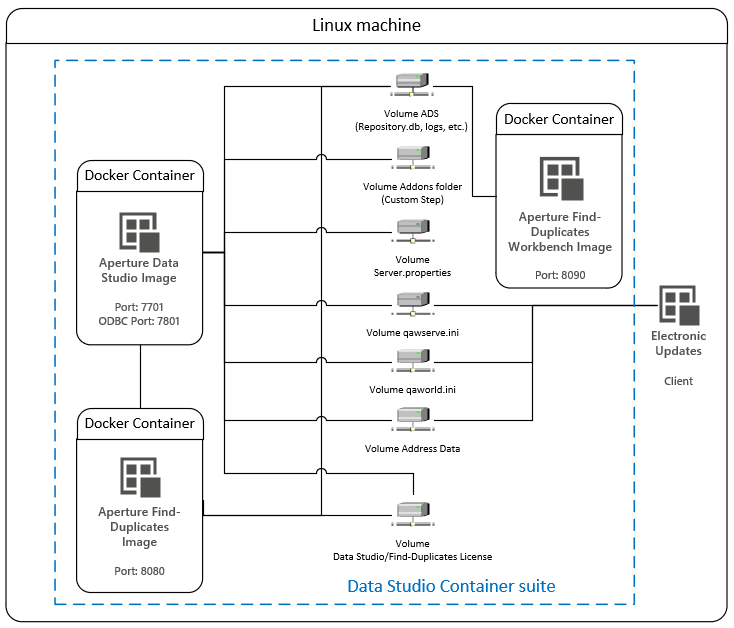
The diagram above illustrates the topology of the Data Studio Container suite in a Linux machine.
Electronic Updates (EU) feeds the latest reference data to Data Studio which is used by the Validate addresses step. The user either needs to have a Windows environment to use the Windows client provided or implement their own integration using the REST API.
Following are the exposed volumes which can be mounted to the host machine:
Set up files and folders
This step will only need to be run once and can be skipped for subsequent upgrades. You will need to execute setup.sh which will provision all the required volumes in the host machine required for the Data Studio Docker container. The folders and files are
The setup.sh also will create the Experian user and assign to the folders above. Experian user is required by Data Studio Docker container for read/write purposes.
You may modify the location of the volumes in the setup.sh and docker-compose.yml file. For example,
mkdir -p <new host directory>/addons
Load images
There are 3 images which assemble the whole Data Studio v2 suite: Data Studio, Find Duplicates, and Find Duplicates Workbench. To load these images, you can either perform one of the following steps:
sudo docker load -i datastudio-<VERSION>-docker.tar.gz
sudo docker load -i find-duplicates-<VERSION>-docker.tar.gz
sudo docker load -i find-duplicates-workbench-<VERSION>-docker.tar.gz
Build, start and stop container with docker-compose
To start the containers, you will need to execute the following command at the folder which contain docker-compose.yml file.
sudo docker-compose up -d
Following are the content of docker-compose.yml. Let's analyze the code line by line.
version: "3"
services:
  datastudio:
    image: "experian/datastudio:2.0.15.178987"
    ports:
      - "7701:7701"
      - "7801:7801"
    volumes:
      - /opt/ApertureDataStudio/.experian:/opt/ApertureDataStudio/.experian
      - ./ApertureDataStudio:/ApertureDataStudio
      - ./ApertureDataStudio/server.properties:/opt/ApertureDataStudio/server.properties
      - ./ApertureDataStudio/addons:/opt/ApertureDataStudio/addons
      - ./AddressValidate/qawserve.ini:/opt/ApertureDataStudio/addressValidate/runtime/qawserve.ini
      - ./AddressValidate/qaworld.ini:/opt/ApertureDataStudio/addressValidate/runtime/qaworld.ini
      - ./AddressValidate/batchData:/opt/ApertureDataStudio/addressValidate/runtime/batchData
  find-duplicates:
    image: "experian/find-duplicates:2.0.15.178987"
    ports:
      - "8080:8080"
    volumes:
      - /opt/ApertureDataStudio/.experian:/opt/ApertureDataStudio/.experian
      - ./ApertureDataStudio/experianmatch:/home/experian/ApertureDataStudio/data/experianmatch
  find-duplicates-workbench:
    image: "experian/find-duplicates-workbench:2.0.15.178987"
    ports:
      - "8090:8090"
    volumes:
      - ./ApertureDataStudio/experianmatch:/opt/FindDuplicatesWorkbench/experianmatch
The datastudio service:
- The address validate reference data directory (batchData in the example above) is to be created and *docker-compose.yml* file is to be configured by the user.
- The number of subdirectories in the address validate reference data directory depends on the number of countries subscribed by the user.
- Data Studio requires access to local resources to create index files during Workflow execution. Data Studio might be accessing or creating multiple index files per execution depending on the workflow complexity and used steps. Hence, you can enhance *Ulimits* to allow Data Studio accessing higher volume of local resources per execution. This can be set through *soft* (mininum limit) and *hard* (maximum limit) values. For example:
yml
ulimits:
nofile:
soft: "1048576"
hard: "1048576"
- You can also specify the memory usage for `datastudio` service through the YAML file. For example
yml
command: "java -Xms4G -Xmx32G -jar servicerunner-2.2.2.jar STARTUP"
```
The above command starts Data Studio v2.2.2 with memory usage between 4GB and 32GB.
The find-duplicates service:
datastudio service.find-duplicates section.yml
<host directory which contains the KB>:/opt/Standardize/Data
The find-duplicates-workbench service:
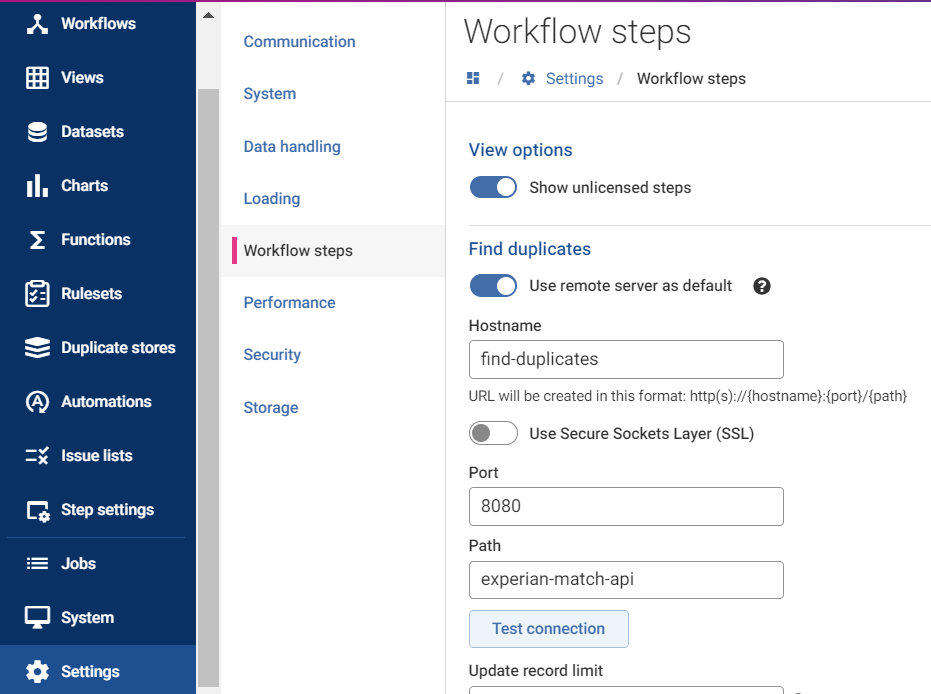
find-duplicates service. You can remove any of the unused services from docker-compose.yml.
[Optional] To stop the containers, you will need to execute the following command at the folder which contain docker-compose.yml file.
shell
sudo docker-compose down
To upgrade Data Studio, download the new version of Data Studio (container image and setup files) and repeat steps 2 & 3 in the section above.
The newly downloaded load-image.sh and docker-compose.yml should reflect the new Data Studio version so no modifications are required.
For Red Hat Enterprise Linux 8 (RHEL8), please use commands below to get newer version.
sudo yum module enable container-tools:rhel8
sudo yum module install container-tools:rhel8
Load images
There are 3 images which assemble the whole Data Studio v2 suite: Data Studio, Find Duplicates, and Find Duplicates Workbench. To load these images, you can either perform one of the following steps:
podman load -i datastudio-<VERSION>-docker.tar.gz
podman load -i find-duplicates-<VERSION>-docker.tar.gz
podman load -i find-duplicates-workbench-<VERSION>-docker.tar.gz
Set up files and folders
This step will only need to be run once and can be skipped for subsequent upgrades. You have to execute the setup-podman.sh, which will create all the required files and folders in current folder.
chmod +x setup-podman.sh
./setup-podman.sh
Create pod and containers
The create-pod-containers.sh will create a pod named "datastudio-pod" and 3 containers from the loaded container images.
chmod +x create-pod-containers.sh
./create-pod-containers.sh
If "datastudio-pod" already used by existing pod, you have to remove the existing pod by running script below:
chmod +x remove-pod-containers.sh
./remove-pod-containers.sh
Manage pod
shell
podman pod ls
shell
podman pod start datastudio-pod
shell
podman pod stop datastudio-pod
To upgrade Data Studio, download the new version of Data Studio (container image and setup files) and repeat steps 2 & 3 in the section above.
The newly downloaded load-images-podman.sh and create-pod-containers.sh should reflect the new Data Studio version so no modifications are required.

Secure Sockets Layer (SSL) can be enabled for Data Studio containers running on Docker or Podman.
To use SSL, you need a certificate. First, get the required certificate and key files. If you don't have them available, use the command below to create two sample files ('example.crt' and 'example.key'):
openssl req -x509 -newkey rsa:4096 -sha256 -days 365 -nodes \
  -keyout example.key -out example.crt -subj "/CN=example.com" \
  -addext "subjectAltName=DNS:example.com,DNS:example.net,IP:10.0.1.4"
To import a certificate:
chown -R 49082:49082 ApertureDataStudio environment:
JVM_OPTS: >
-Djavax.net.ssl.trustStore=/opt/ApertureDataStudio/cert/cacerts
We recommend using a Docker NGINX container alongside Data Studio if there's a need for a reverse proxy for SSL termination.
All Data Studio ports are fixed in order to run in a Docker container environment.
As such, mapping to different ports through configuring the docker-compose.yml or nginx.conf files will not work.
To use the standard SSL port 443, this will have to be configured in the server.properties file by adding the following line:
Server.httpPort=443
Communication.useSSL=true
A certificate is required in order to use SSL. The command below will create 2 files: example.crt, example.key. These files will be need to be provided to the NGINX container later.
openssl req -x509 -newkey rsa:4096 -sha256 -days 365 -nodes \
  -keyout example.key -out example.crt -subj "/CN=example.com" \
  -addext "subjectAltName=DNS:example.com,DNS:example.net,IP:10.0.1.4"
Create a nginx.conf file with the content below:
server {
    listen 443 ssl;
    ssl_certificate /etc/nginx/certs/example.crt;
    ssl_certificate_key /etc/nginx/certs/example.key;
    location / {
        proxy_http_version 1.1;
        proxy_set_header Host $host;
        proxy_set_header X-Real-IP $remote_addr;
        proxy_set_header Upgrade $http_upgrade;
        proxy_set_header Connection "upgrade";
        proxy_pass https://datastudio:443/;
    }
}
Update the docker-compose.yml file to include the NGINX container.
Mount the folder that contains the example.crt and example.key created in the step earlier above to "/etc/nginx/certs".
Mount the nginx.conf created above to "/etc/nginx/conf.d/nginx.conf".
version: '3'
services:
  datastudio:
    image: "experian/datastudio:2.1.0"
    ports:
      - "8443:443"
    volumes:
      - /opt/ApertureDataStudio/.experian:/opt/ApertureDataStudio/.experian
      - ./ApertureDataStudio:/ApertureDataStudio
      - ./ApertureDataStudio/server.properties:/opt/ApertureDataStudio/server.properties
      - ./ApertureDataStudio/addons:/opt/ApertureDataStudio/addons
      - ./AddressValidate/qawserve.ini:/opt/ApertureDataStudio/addressValidate/runtime/qawserve.ini
      - ./AddressValidate/qaworld.ini:/opt/ApertureDataStudio/addressValidate/runtime/qaworld.ini
      - ./AddressValidate/batchData:/opt/ApertureDataStudio/addressValidate/batchData
  nginx:
    image: "nginx:1.19.0"
    ports :
      - "443:443"
    volumes:
      - ./Nginx/certs:/etc/nginx/certs
      - ./Nginx/nginx.conf:/etc/nginx/conf.d/nginx.conf
    environment:
      no_proxy: datastudio
Once the docker-compose up command is run, access with SSL will be enabled.
Download log4j2.xml and put it into ApertureDataStudio of the host machine. It is the same path as server.properties file located.
Modify the logging level through the downloaded file and mount it to "/opt/ApertureDataStudio/log4j2.xml".
version: '3'
services:
  datastudio:
    image: "experian/datastudio:2.1.0"
    ports:
      - "8443:443"
    volumes:
      - /opt/ApertureDataStudio/.experian:/opt/ApertureDataStudio/.experian
      - ./ApertureDataStudio:/ApertureDataStudio
      - ./ApertureDataStudio/server.properties:/opt/ApertureDataStudio/server.properties
      - ./ApertureDataStudio/log4j2.xml:/opt/ApertureDataStudio/log4j2.xml
      - ./ApertureDataStudio/addons:/opt/ApertureDataStudio/addons
      - ./AddressValidate/qawserve.ini:/opt/ApertureDataStudio/addressValidate/runtime/qawserve.ini
      - ./AddressValidate/qaworld.ini:/opt/ApertureDataStudio/addressValidate/runtime/qaworld.ini
      - ./AddressValidate/batchData:/opt/ApertureDataStudio/addressValidate/batchData
For the Docker container, add the following command section in docker-compose.yml file. Modify -Xms (minimum heap size which is allocated at initialization of JVM) and -Xmx (maximum heap size that JVM can use) to the intended value.
version: '3'
services:
  datastudio:
    image: "experian/datastudio:2.1.0"
    command: java -XX:+UseG1GC -XX:+UseStringDeduplication -Xms16G -Xmx64G -jar servicerunner-2.1.0.jar "STARTUP"
    ports:
      - "8443:443"
    volumes:
      - /opt/ApertureDataStudio/.experian:/opt/ApertureDataStudio/.experian
      - ./ApertureDataStudio:/ApertureDataStudio
      - ./ApertureDataStudio/server.properties:/opt/ApertureDataStudio/server.properties
      - ./ApertureDataStudio/log4j2.xml:/opt/ApertureDataStudio/log4j2.xml
      - ./ApertureDataStudio/addons:/opt/ApertureDataStudio/addons
      - ./AddressValidate/qawserve.ini:/opt/ApertureDataStudio/addressValidate/runtime/qawserve.ini
      - ./AddressValidate/qaworld.ini:/opt/ApertureDataStudio/addressValidate/runtime/qaworld.ini
      - ./AddressValidate/batchData:/opt/ApertureDataStudio/addressValidate/batchData
For Podmad, append the java entry point at the end of the podman run command
podman run --name datastudio localhost/experian/datastudio:2.1.0 java -XX:+UseG1GC -XX:+UseStringDeduplication -Xms16G -Xmx64G -jar servicerunner-2.1.0.jar "STARTUP"
From the Linux machine:
sudo docker exec -it ads_datastudio_1 /bin/bash, where the ads_datastudio_1 referring to the to the provisioned Data Studio container.java -jar servicerunner-[version].jar STARTUP RESETADMINPASSWORD, where the version is the current Data Studio version. exit command.docker-compose command.InstalledData property, make sure that the batch data refers to the path in the container (e.g., /opt/ApertureDataStudio/addressValidate/batchData). DataMapping property field (e.g., GBR,Great Britain,GBR).Server.AddressValidateInstallPath=/container path/addressValidate/runtime.Find out more about configuring address validation in Data Studio.
To confirm that the step was configured correctly:
sudo docker exec -it <container name> /bin/bash LD_LIBRARY_PATH=. ./batwv Data Studio provides support for connecting to External systems which can be used either as data sources or as the target of an export operation. One of the supported systems is connectivity to DBMS via JDBC. In order to do so, you will firstly need to setup the JDBC drivers by following the instructions below.
Once done (and with the appropriate licensing add on), you will have access to the following JDBC drivers.
| DBMS name | Driver file name |
|---|---|
| Amazon Redshift | DSredshift.jar |
Apache Hive
|
DShive.jar |
| Autonomous Rest Connector (REST API data sources) | DSautorest.jar |
| Cassandra | DScassandra.jar |
| DB2 | DSdb2.jar |
| Google BigQuery | DSgooglebigquery.jar |
Greenplum
|
DSgreenplum.jar |
| Informix | DSinformix.jar |
| MongoDB | DSmongodb.jar |
| Microsoft Dynamics 365 | DSdynamics365.jar |
| MySql | DSmysql.jar |
| Oracle | DSoracle.jar |
| Oracle Eloqua | DSeloqua.jar |
| Oracle Sales Cloud | DSoraclesalescloud.jar |
| Oracle Service Cloud | DSrightnow.jar |
| PostgreSQL | DSpostgresql.jar |
| Progress OpenEdge | DSopenedgewp.jar |
Salesforce
|
DSsforce.jar |
| Snowflake | DSsnowflake.jar |
| Spark SQL | DSsparksql.jar |
SQL Server
|
DSsqlserver.jar |
| Sybase | DSsybase.jar |
Full documentation for these drivers can be found on the Progress DataDirect Connectors site, under the relevant source.